The last month I have been forensically analyzing the KAI OS 2.5, formally FireFox OS. We are seeing a bunch of these feature phones in our lab.
Download KAI OS Forensics for Money and Profit
Download KAI OS CheetSheet
#kaios #firefoxos #forensics #reversing
Tuesday, January 1, 2019
Wednesday, October 16, 2013
Wisconsin Association of Computer Crime Investigators 2013 Conference
"Sup" (...been a long while)
PTFinderFE is obsolete do to the new innovations in Volatility.
(Updated 10/20/13)My New Volatility Batch File Maker does all that PTFinderFE did and MORE!!!
*****Known Issue with processing x64 memory and creating Memdump.bat, Procmemdump and Vaddump.bat files -Fix by 10-21-2013
The New Volatility Batch File Maker is a little kludgy but usable.
The Win8 (very beta V6) Enscript does find eprocess block artifacts but doesn't currently include the offset to the PDB or the Offset.( I know- the offset to the offset)
Other Tools
Graphviz 2.34 MSI
Volatility 2.2 Standalone .exe
Volatility Test Samples
Friday, October 12, 2012
WACCI Conference 2012 - Tip and Tricks Notes
Wisconsin Association Computer Crimes Investigator Conference 2012
Tip and Tricks Notes:
"Thank you" for all the great input.
Digital Intelligence
Forensic Scanner
RegRipper
CERT Tools (Registration Required)
Dumpit
Volatility
Shadowkit
OS Triage (Registration Required)
WeibeTech HotPlug
iSightPartners (Registration Required)
UPX ENCASE GREP Expression \xE0UPX\x00\x00
Tuesday, January 25, 2011
EnScripts (EnPacks) to Carve iPhone SMS Messages
These are tools to find SMS Messages from physical (carve) or logical files, recovered from an iPhone (DOWNLOAD).
This tool is really meant to find unallocated SMS Messages in a Raw disk recovery of the user disk partition as extracted by tools (http://oreilly.com/catalog/9780596153595)like the one created by Johnathon Zdziarski. (http://www.zdziarski.com/blog/?page_id=503).
If you obtain a logical copy of the files from the iPhone then you can use this tool to parse some of the information out of the SMS.db.
I created following two Enscripts to carve out SMS Messages:
1. iPhone SMS Remnant - Search by Telephone Number.EnPack is a Enscript that will prompt you for a telephone number to specifically search.
When you run the script you have to “Blue Check” all files you want to scan.
Output is to Console, Search Hits tab and Bookmark Tab. The Bookmark Tab Comment Section contains the following Information
2. iPhone SMS Remnant - Find All.EnPack is an Enscript that will attempt to find all the SMS Messages regardless of the telephone number. (After you find you "target" telephone number I recommend you use the iPhone SMS Remnant - Search by Telephone Number because it appears to find some additional remnants that this Enscript might miss.) You don't have to use the entire number you can also use just a area code ("414)or an area code + prefix(414935). Do not use and salad (spaces,dashes or wildcard characters).
My Research:
This was tested against an iPhone Version Model MB704 – Revision 3.1.3(7E18).
Test SMS.db(s) was SQLite format 3.
Sometimes the hits were like "+14145551212" and sometime they were "4145551212"
When creating these ENSCRIPTS I used a "Default Bookmark folder" so if you run these Enscript more then once each in your case, without changing the bookmark folder name, it will just OVERWRITE the previous search WITHOUT notice.
A majority of the "False Positives" appear to Call History Remnants.
To Do: This tool would be easy to change/update to find call history in allocated (call_history.db) and unallocated space.
Sunday, October 17, 2010
New Win7 Process Enscript (Beta)
I updated my Basic Memory Analysis Enscripts (Version 6) and rolled them out at the 2010 WACCI Conference. The newest addition is an Enscript to carve for Windows 7 Processes (Exited and Running).
Important ---If you downloaded the new Enscripts prior to 10/17/2010 please update your download to Version 2.1 - I made some changes to the Win7 (Beta) Enscript.
The magic number I am using is part of the _DISPATCHER_HEADER of the _KPROCESS.
\x03\x00\x58\x00[\x00\x01]\x00\x00\x00.[\x01-\xff]....\xff\xff.
The _KPROCESS is the first entry of the _EPROCESS.
Some Information Regarding the New Enscripts:
All the new Enscripts create a default folder to place search hits and bookmarks. If you run the Enscripts at more then one memory image you will co-mingle hits/bookmarks. And if you don’t rename the folders prior to re-running the script – there is no fail-safe check and your original folder will be overwritten.

To run any of the Enscripts just drop them into your main Enscript folder (usually C:\program files\Encase6 \Enscripts).

My RESEARCH:
\x03\x00\x58\x00[\x00\x01]\x00\x00\x00 (Too many false positives)
\xff\xff\x03\x00\x58\x00[\x00\x01]\x00\x00\x00(Missed processes)
I also tried to use something unique besides the Dispatch Header. I tried to use the following magic number which I believe is the Swap List Entry of the KPROCESS Block.
“\x04\x00\x04\x00\x00\x00\x00\x00.\x00\x00\x00\x00\x00\x00\x00\x00\x00\x00\x00\x00\x00\x00\x00\x00\x00\x00\x00\x00\x00\x00\x00\x00\x00\x00\x00\x00\x00\x00\x00[\x09\x08]” I do know that I could have used \x04\x00\x04\x00{36,36}[\x09\x08]
This also missed several processes in my test data.
The following is output from WinDBG for the command “dt _eprocess”:
Windows 7 Kernel Version 7600 MP (8 procs) Free x64
Product: WinNt, suite: TerminalServer SingleUserTS
Built by: 7600.16617.amd64fre.win7_gdr.100618-1621
Machine Name:
Kernel base = 0xfffff800`02c67000 PsLoadedModuleList = 0xfffff800`02ea4e50
Debug session time: Mon Oct 11 14:12:52.405 2010 (UTC - 5:00)
System Uptime: 0 days 0:15:33.732
lkd> dt _eprocess
nt!_EPROCESS
+0x000 Pcb : _KPROCESS (Location of the _DISPATCHER_HEADER)
+0x160 ProcessLock : _EX_PUSH_LOCK
+0x168 CreateTime : _LARGE_INTEGER (Dec Offset 360)
+0x170 ExitTime : _LARGE_INTEGER(Dec Offset 368)
+0x178 RundownProtect : _EX_RUNDOWN_REF
+0x180 UniqueProcessId : Ptr64 Void(Dec Offset 384)
+0x188 ActiveProcessLinks : _LIST_ENTRY
-------------------------Truncated
+0x290 InheritedFromUniqueProcessId : Ptr64 Void(Dec Offset 656)
------------------------Truncated
+0x2e0 ImageFileName : [15] UChar(Dec Offset 736)
THANK YOU:
A special “Thank You” to Lance Mueller for his AWESOME Free Enscript Tutorial which was a HUGE Help to me.
Wednesday, September 1, 2010
The Mystery of ROT (-29)
I know if your reading my blog you've seen ROT13 and know it is used by Microsoft in the UserAssist Registry Key.
But now I’ve found Microsoft using ROT(-29) or Rotate Minus 29 which is considerably more devious, then ROT13, for the forensic investigator.
Do the following steps to uncover ROT(-29):
1. First find a computer running Windows 7 or Vista.
2. Open Notepad and type: “ForensicZoneaaaaaaaaaabbbbbbbbbbcccccccccddddddddddForensicZone”.
3. Run Task Manager (taskmgr.exe).
4. Application Tab > Select the Notepad Task >Right Click and “Create Dump File”.
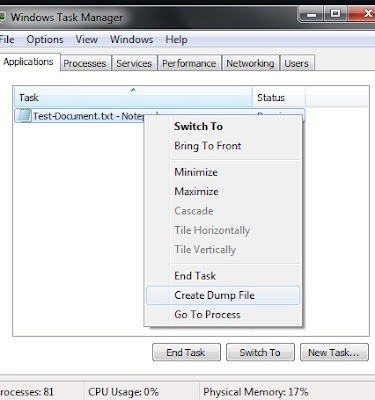
This action creates a "user-mode process dump file" at C:\Users\Your-UserName\AppData\Local\Temp\notepad.dmp
5. Open notepad.dmp using your favorite hex editor.
Scroll up from the bottom of the dump file approximately 6000 to 11000 bytes and you should see the following:
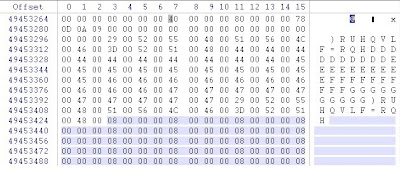
So if we decipher the information in the notepad.dmp file we see that
ASCII “F” (Dec 70) became ASCII “)” (Dec 41) – A Rotation of Minus 29
ASCII “o” (Dec 111) became ASCII “R” (Dec 82)
ASCII “r” (Hex 72) became ASCII “U” (Hex 55)
ASCII “e” - You get the picture
So “ForensicZone” becomes “ ) R U H Q V L F = R Q H”
Ok. So it is Rotation (-29) and a conversion to Unicode.
The Rotation -29 is more devious then ROT-13 because:
- Numbers and most of the Special Characters do not convert to a printable ASCII range.
- Capitol Letters are converted to numbers and special characters.
- The Unicode also makes it easy to overlook this information.
I then started conducting searches on dead Windows 7 and Vista Machines looking for the ROT (-29) in the wild. I used several search terms but haven’t been able to find much practical use for this information, as of yet. I also couldn't find a consistent magic number and the only hits I could find was on the word Microsoft (Microsoft + ROT(-29) = 0 L F U R V I Q) mostly dealing with Microsoft Office Document Metadata. (Note: The funny looking 0 is a zero)
There might be an easy explanation for Microsoft using ROT (-29) but I don't know what it is. If I am way off base or someone else has information about this please let me know.
Additional:
I discovered ROT(-29) while preparing for my presentation for the Wisconsin Association Computer Crimes Investigators (WACCI) Conference 2010. One of the Keynote Speakers I am really looking forward to meeting at the WACCI 2010 Conference is Harlan Carvey.
Friday, October 16, 2009
Walk-Through: Volatility Batch File Maker and Volatility's VadDump
*********** The First 5 Steps are exactly the same as my last posted regarding Walk-Through: Volatility Batch File Maker and Volatility's ProcDump. The Walk-through Portion is repeated here for future discussions. Skip if applicable.******************
1. Download the following files from Hogfly (Website)
exemplar6.tar.gz.001
exemplar6.tar.gz.002
exemplar6.tar.gz.003
In my example I placed the files in e:\exemlar6\ directory
2. Add the downloaded files together and Extract with the following cmd prompt code:
Copy /b “exemplar6.tar.gz.001”+ “exemplar6.tar.gz.002”+” exemplar6.tar.gz.003” exemplar6.tar.gz
3. Extract using WinRAR (exemplar6.tar.gz to exemplar6.vmem)
4. Run PtfinderFE against extracted file(exemplar6.vmem) which creates exemplar6.txt

5.Run Volatility Batch File Maker.
-a. Select e:\exemlar6\xemplar6.vmem with “Browse for Memory Capture”.
-b. Select e:\exemlar6\exemplar6.txt (created by PtFinderFE) for your memory image with “Browse for Offset Text File”.
-c. Create Batch (Which is hidden until the previous listed fields are populated).
6. .Goto the directory containing exemplar6.vmem (e:\exemlar6\) and run e:\exemlar6\vaddump.bat file.
7.Browse the e:\exemlar6\vaddump folder.(The following images is a truncated view of the vaddump directory's content):

8. Drop the entire vaddump directory and the original exemplar6.vmem into ENCASE (or your forensic tool of choice).
9. Hash all the files (Search>Calculate hash value).
10. Compare Hash Values. First you will notice some duplicated hash values between VAD files from different processes. I believe this shows that there is possibility of some type of relationship between the different processes. Look at the three files with the hash of 2defb57866392bd7145b3b85894d3a4a
atsxyzd.sys.1b13b40.00af0000-00af7fff.dmp
dxonool32.sys.17fc678.00e90000-00e97fff.dmp
dw8.exe.17f7020.00a20000-00a27fff.dmp
In my last post atsxyzd.sys, dxonool32.sys and dw8.exe were identified as suspected malware.
Now look at the VAD contents that are the same for all three files. The following is a text tepresentation(truncated)of the similar VAD Files (Hash:2defb57866392bd7145b3b85894d3a4a):
Client UrlCache MMF Ver 5.2··€···P··€···U········Äý······ø······················CLUBCLEZ
····KPAN45MJ····0HEN0X2F····WTE74L2Z····················
We can then create search words out of CLUBCLEZ, KPAN45MJ, 0HEN0X2F and WTE74L2Z(which look like they might be folder names used by Internet Explorer). For every hit in the VAD files there is a hit in the original VMEM File. There is one additional hit in the VMEM file for each search term which we would then try and figure out.
11. Create search term like “http://” and go “cherry picking” you can find a lot of IP Addresses in the suspected malware. It is very easy to find the context to your search hits just by looking at the file they are located in.
There is approximately 107 megabytes of VAD files (without duplicates). The total size of the original VMEM is 256 megabytes. That is 2/5 context provided for this dump file. In less then 6 minutes.
Subscribe to:
Posts (Atom)