Carrier: Verizon
I was unable to make a download the contents of the handset using the following products ENCASE, BITPIM, PARABEN or DD so I made backup copy of the internal contents in the most forensically sound manner possible using VERIZON WIRELESS SOFTWARE INSTALLATION DISC (A/N 185-10134-01).
I installed PALM DESKTOP SOFTWARE and used HOTSYNC to make back-up files of the TREO 360 file system. I then extracted and converted the recovered information in the following ways:
1. CALENDER: I used PALM DESKTOP to export the entire calendar to a Datebook Archive (dba) file named “datebook archive.dba”. I then used an empty calendar at YAHOO.COM to import “datebook archive.dba” and exported the contents to a file called “calender.csv”.
2. CONTACTS and TASKS: I used the SEND to > MS Excel in the PALM DESKTOP.
3. MEMOS: I used the SEND TO > MS WORD in the PALM DESKTOP.
4. CALLS: I took a copy of the file from “\XXXXXXXX\Backup\PhoneCallDB.PDB created during the “XXXXXXXX” HOTSYNC and converted it with a program called “CH”. (Download here – http://bigtex.jrv.org/Treo-calldb) The program converted the input into a MICROSOFT EXCEL SPREADSHEET. The program “CH”, and the source code is included in the “Working Directory” in the forensic archive.
5. PHOTOS, IMAGES sand VIDEOS: Images were transferred from the handset during HOTSYNC and placed into the “XXXXXXXX” Folder. Using a hex editor on the file “Saved_prefrences.PRC “ I discovered the Phone Number of owner
The following is addition information regarding the forensic examination:
Computer connection using Cable 180-10017-00 REV B 0516 with HOT SYNC Button.
• The HOTSYNC automatically created the user file name of “XXXXXXXX” for the contents of the seized item.
• Consol Mode was achieved using the following key inputs:
Option Button and Shift–find Button
Input “s” and push ALT Button
Scroll to bottom and choose “ dotted looped l”
Enter “.”
Enter 1
Wednesday, September 26, 2007
“Carving” out pictures from a Handset (ENCASE V5)
The first thing I want to clarify is the definition of “Carve” in this page. So you, or another investigator, manually review a handset using its internal operating system and determine the picture you need is no longer on the handset. Sometimes images might not be accessible to the user but there might be images still residing in the logical memory of the handset.
I know what you are thinking: Open up a Case in Encase and automatically CARVE for images in the phone files. In my experience this answer is half right. (We need to create a special search in Encase to be sure we can find all the images.)
Here’s my suggestion:
1. First you have to obtain a dump of the handset’s content.
If you used BITPIM (Root.zip) then you are ready to start ENCASE
If you used PARABEN DEVICE SEIZURE then use Paraben's Report Feature. And choose to create a HTML Report and include all items from the case. Paraben's report will save the files needed for the HTML Report in a folder called.Html Files. Take all the files in Html Files folder and add them to a ZIP file. For consistency we will also call this new ZIP Folder Root.zip.
2. Start a New Case in ENCASE.
Maneuver you way down to the Home>Entries and right click on Entries>Activate Single File
Right Click on Single Files>New (which opens up a common dialog box for you to find your Root.Zip file)
Open up Enscripts and choose File Mounter>File by Extension>Zip files. Your single Root.zip file is activated and the Root.Zip folder mounted. You can now walk through the file structure.
Different handsets use slightly different headers in their images. Sometime images are imbedded in files with long headers (containing valuable EXIF Data) but are overlooked by Forensic Programs that just look for predetermined headers and offsets.
3. Find a stored image. Choose one that looks like it was taken by the handset's camera.
Look at that image in hex and get the header information. Double check you header with a couple other images that appear to be taken with a camera. In our example the header is FF D8 FF E0 for image photo_004.jpg

4. Now open ENSCRIPTS again and Choose "Sweep Case".
a. Check the box for your case>Next
b. Find the Modules List and Check the box for "File Finder"
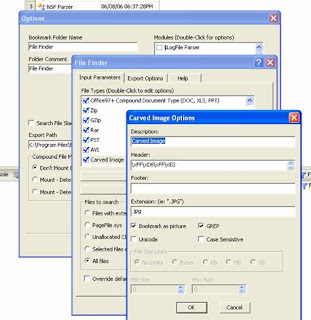
c. Double left click on File Finder. A File Finder Menu opens up and you might as well check all the options (BMP, JPG PNG, ...).But also click on the bar "Add Custom File Type" and add the following:
d. Description: Carved Image
e. Header: \xFF\xD8\xFF\xE0 (For our example- but use whatever you found in the header of your images)
f. Footer: Empty
g. Extension: .jpg
h. Check the following Boxes: "Bookmark as picture" and "GREP"
i. OK>OK>Finish
j. Open your BOOKMARKED folder and see how many new images you have found that you could not get find using the handset. You have now "Carved" some images from the handset.
Don't forget to SAVE ALL so you don't have to re-write the "Add Custom File Type" each time you only have to update the Header Hex Information.
The first thing I want to clarify is the definition of “Carve” in this page. So you, or another investigator, manually review a handset using its internal operating system and determine the picture you need is no longer on the handset. Sometimes images might not be accessible to the user but there might be images still residing in the logical memory of the handset.
I know what you are thinking: Open up a Case in Encase and automatically CARVE for images in the phone files. In my experience this answer is half right. (We need to create a special search in Encase to be sure we can find all the images.)
Here’s my suggestion:
1. First you have to obtain a dump of the handset’s content.
If you used BITPIM (Root.zip) then you are ready to start ENCASE
If you used PARABEN DEVICE SEIZURE then use Paraben's Report Feature. And choose to create a HTML Report and include all items from the case. Paraben's report will save the files needed for the HTML Report in a folder called
2. Start a New Case in ENCASE.
Maneuver you way down to the Home>Entries and right click on Entries>Activate Single File
Right Click on Single Files>New (which opens up a common dialog box for you to find your Root.Zip file)
Open up Enscripts and choose File Mounter>File by Extension>Zip files. Your single Root.zip file is activated and the Root.Zip folder mounted. You can now walk through the file structure.
Different handsets use slightly different headers in their images. Sometime images are imbedded in files with long headers (containing valuable EXIF Data) but are overlooked by Forensic Programs that just look for predetermined headers and offsets.
3. Find a stored image. Choose one that looks like it was taken by the handset's camera.
Look at that image in hex and get the header information. Double check you header with a couple other images that appear to be taken with a camera. In our example the header is FF D8 FF E0 for image photo_004.jpg

4. Now open ENSCRIPTS again and Choose "Sweep Case".
a. Check the box for your case>Next
b. Find the Modules List and Check the box for "File Finder"
c. Double left click on File Finder. A File Finder Menu opens up and you might as well check all the options (BMP, JPG PNG, ...).But also click on the bar "Add Custom File Type" and add the following:
d. Description: Carved Image
e. Header: \xFF\xD8\xFF\xE0 (For our example- but use whatever you found in the header of your images)
f. Footer: Empty
g. Extension: .jpg
h. Check the following Boxes: "Bookmark as picture" and "GREP"
i. OK>OK>Finish
j. Open your BOOKMARKED folder and see how many new images you have found that you could not get find using the handset. You have now "Carved" some images from the handset.

Don't forget to SAVE ALL so you don't have to re-write the "Add Custom File Type" each time you only have to update the Header Hex Information.
Subscribe to:
Comments (Atom)